换一种空间组的圈细胞可视化方式
大多数文章在进行空间转录组细胞可视化的时候,通常会使用 square bin 或是 cellbin,但是究其展示本质,其实还是 square bin,比如下面的这种,每个细胞的呈现形式是一个 spot_size 固定为某个值的点。
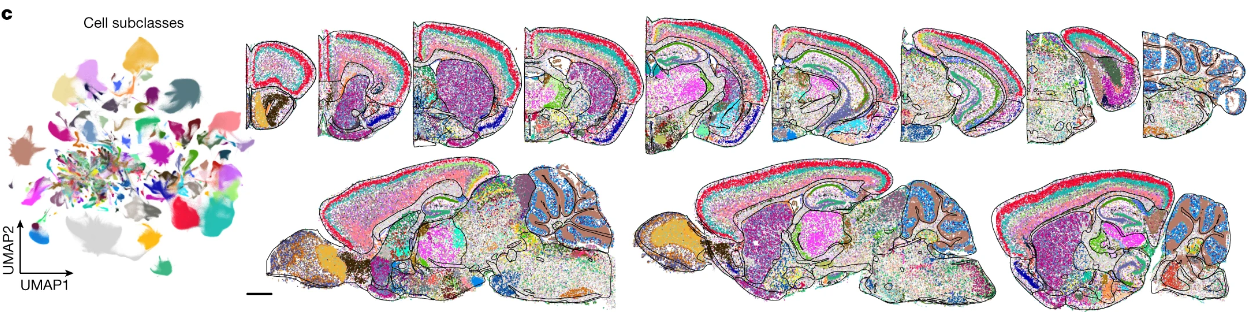
但是有的文章的可视化就做的非常好,每个细胞不仅能够显示细胞形态,也能够显示细胞类型,比如这一种:

那这样子的效果要如何绘制呢?我的理解是每个细胞的label,对应圈细胞结果上的一群细胞覆盖的像素点,然后这些像素点都被打上细胞label,对圈细胞结果分析之后,可视化的时候,把每个细胞对应的label的像素点绘制上不同的颜色。
代码如下所示
1 | import scanpy as sc |
All articles on this blog are licensed under CC BY-NC-SA 4.0 unless otherwise stated.
Related Articles

2023-12-29
Calculate the complexity of cells in a region
In some spatial group atlas articles, we often see a picture, which is to calculate the complexity of cells in a region. We take an article published in Cell this year as an example to see how to calculate the complexity of cells in a region. The name of the article is Single-cell spatial transcriptome reveals cell-type organization in the macaque cortex, and the link to the article is: https://linkinghub.elsevier.com/retrieve/pii/S0092867423006797, there is such a picture in Figure II: The...
2024-01-03
spatial Transcription region deg genemodule heatmap GO analysis
After the spatial transcriptome is annotated manually, the regional annotation information of the spatial group is obtained. At this time, we want to obtain the functional annotation information of its differentially expressed genes. There is no universal script here. I only provide an idea. ,For reference. Since most of our spatial group data is in the h5ad file format of anndata, we need to convert it into the rds file format that can be read by seurat. Here we use a convenient tool that...
2024-01-02
各区域不同细胞类型的统计
在处理空间组的数据的时候,很多情况下,我们会根据解剖学知识给某些地方进行区域注释;这块区域的细胞类型则是通过单细胞映射空间组进行的,再进行了手动赋予区域信息以及迁移映射了细胞类型信息之后,则需要对这些进行进行一些可视化以及一些统计分析。 可视化的代码如下,为一柱状堆积图: 12345678910111213141516171819202122232425library(pheatmap)library(ggplot2)library(viridis)library(tidyverse)df = read.table('*.csv', sep = ',')colnames(df) = df[1, ]df = df[-1, ] %>% select(-1)df = df %>% group_by(region) %>% count(celltype)df$Gyrus_Sulcus = factor(df$Ribbon, levels = c('Frontal', 'Insular',...
2024-01-18
换一种UMAP的可视化方式
还是大家熟悉的猴脑文章,可能是大家较为熟悉的一张UMAP图片,但是其呈现方式和其他的UMAP图片却是有所不同,它的UMAP图片如下所示,其名字为Voronoi图: 具体思想如下,画出每个点,然后找出两个点之间的平分线,遍历所有的点,完成构图,进行颜色填充,具体代码如下所示: 12345678910111213141516171819202122232425262728293031323334353637383940414243444546import numpy as npimport matplotlib.pyplot as pltfrom matplotlib.collections import PolyCollectionfrom scipy.spatial import Voronoi, voronoi_plot_2dfrom shapely.geometry import Polygondef bounded_voronoi(bnd, pnts): gn_pnts = np.concatenate([pnts, np.array([[100, 100],...
2024-01-03
空间组deg genemodule heatmap go分析
空间转录组通过手动划区注释之后,得到空间组的区域注释信息,这个时候我们便是想要得到其差异表达基因的功能注释信息,这里并没有能够通用的脚本,本人仅是提供一种思路,供大家参考。 由于我们的空间组的数据大都是 anndata 的 h5ad 的文件格式,所以我们需要将其转换为能够被 seurat 读取的 rds 文件格式,这里采用我们之前博客讲到的一个便捷工具 rds与h5ad的相互转换,大概代码如下所述: 12345sceasy::convertFormat('/data/*.h5ad', from="anndata", to="seurat", main_layer = 'count', outFile='/data/*.rds') 于是便是得到了相应的 rds 文件,之后我们借助 seurat...
2024-01-03
计算某个区域中细胞的复杂性(2)
上一篇帖子提到了猴脑文章中某个区域中细胞复杂性的计算,后面又看到一张图,才是发现自己的计算少了一些东西,这里补充一下。 在原文的图四中还有一个图片,讲述了较为详细的计算过程,如下图所示: 首先是复杂性的获得,我的上一篇相关的博客已经讲了,但是那篇博客的问题也是在于此,我是直接获得了复杂性,把其他的信息都丢掉了,KD树的缺陷也在于此,于是不得已在此进行重构: 1234567891011# 首先是包的引入,这里可能有很多包都是不需要的,但是我懒得删了,就这样吧import numpy as npfrom scipy.spatial.distance import cdistimport anndata as adimport pandas as pdimport matplotlib.pyplot as pltfrom collections import Counterimport seaborn as snsfrom matplotlib.ticker import FuncFormatterfrom matplotlib.colors import...
Comments